
A Travel Photography Tips & Tricks Series Post.
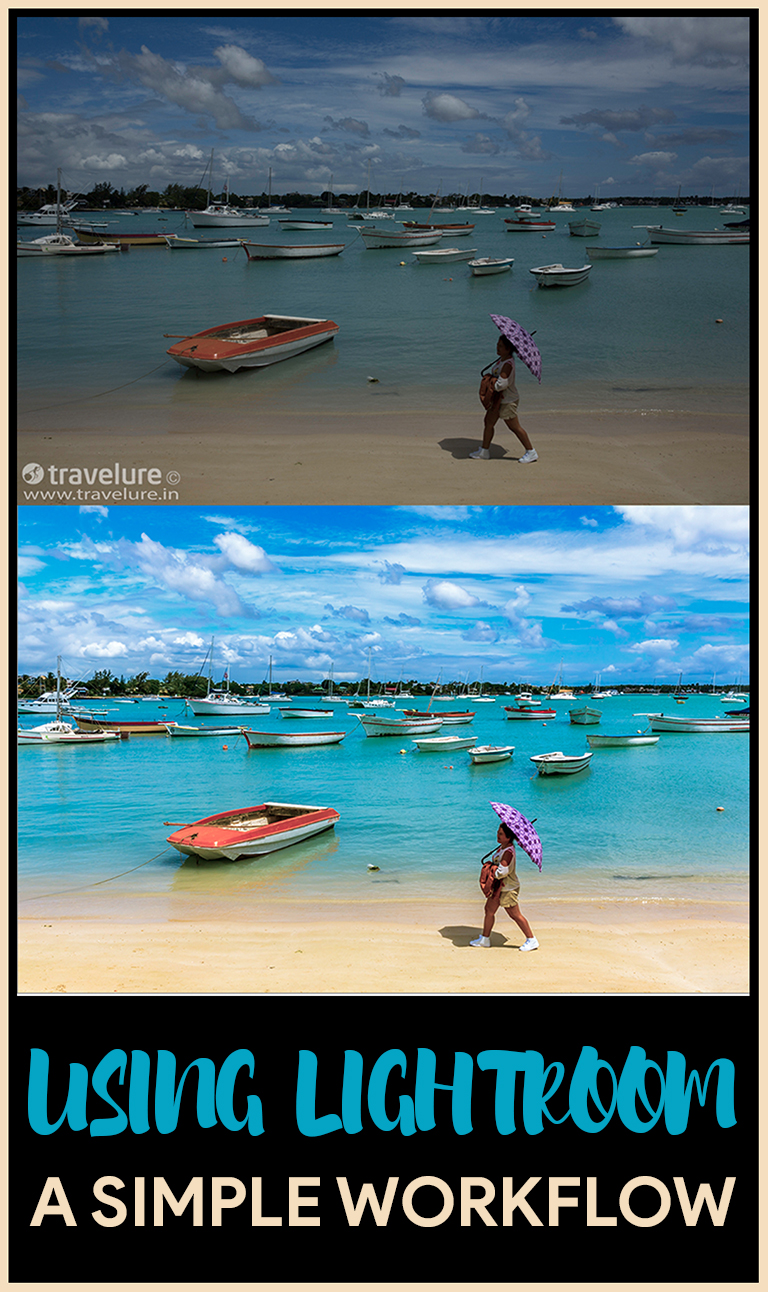
Lightroom – A simple, yet overwhelming tool for many of us!
This post has been updated for Lightroom Classic 14.x and covers new tools including AI Masking, the Texture slider, and Adobe Landscape profile.
Lightroom, with its multiple modules and a huge number of options, could leave people in a state of “OMG!-What-should-I-do-with-these-numerous-sliders-and-controls!” I am attempting to de-mystify this tool in a way that most images that are decently exposed could get tackled by using this post. The process outlined here will work with Lightroom Ver. 14.x or later. The process has been defined for both Mac and Windows users.
This post has been updated for Lightroom Classic 14.x and covers new tools including AI Masking, the Texture slider, and Adobe Landscape profile.
Library Module
To make life easy, start importing your images through Lightroom. Do not, I repeat, DO NOT JUST COPY IMAGES FROM THE CAMERA CARD TO YOUR HARD DISK. USE LIGHTROOM TO IMPORT IMAGES. This will take the hassle out of cataloguing the images. It entails the following steps:

- Open Lightroom and from the ‘FILE’ menu, click ‘New Catalogue’. Give it a name and a location (could be the computer’s native hard disk or an external hard disk)
- Lightroom will close whichever catalogue was open and will reopen with a brand new empty catalogue


Develop Module
Here are the basic steps to follow for most edits (some images could be more tricky and for those, I could run a MasterClass).
- Select the image you wish to process/edit and click on DEVELOP module (see image below for reference).
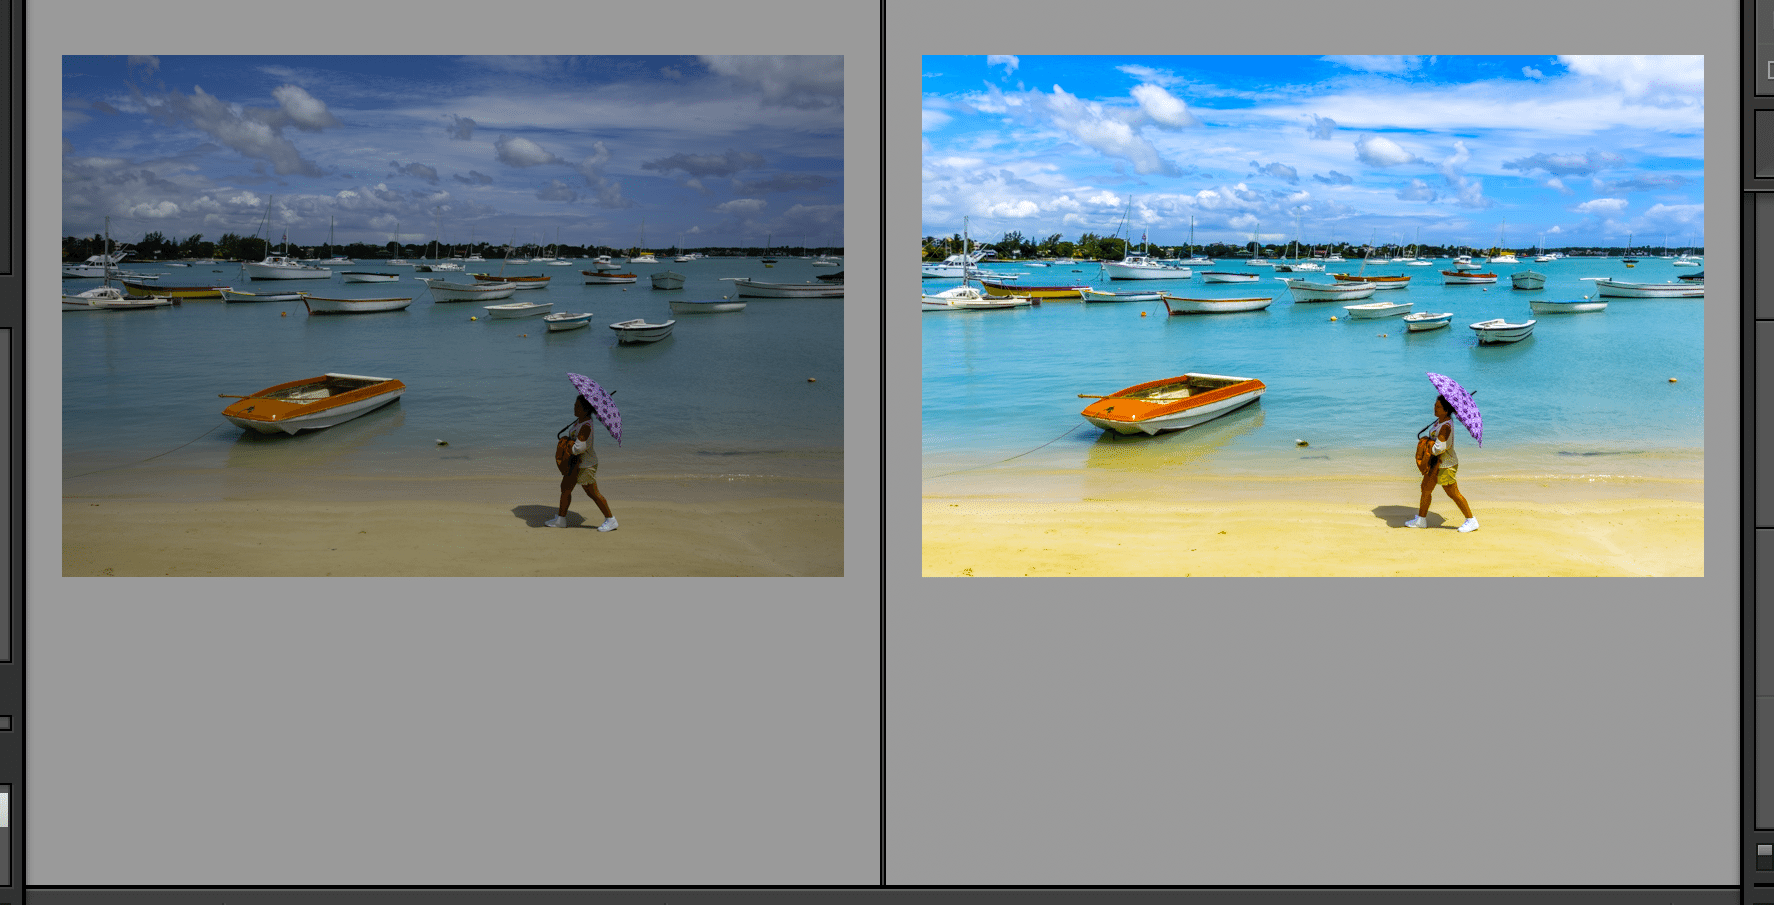
My starting image was Exhibit A.

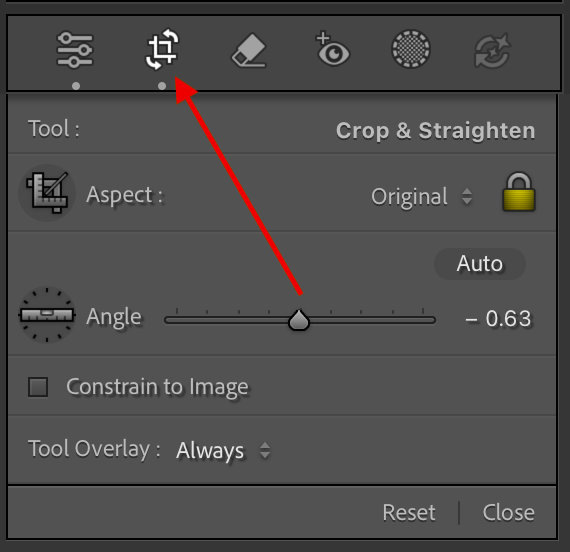
Choose the crop overlay and use the ‘bent double-headed arrow’ to straighten the horizon, or simply click the ‘Auto’ button which uses AI to detect and correct the horizon automatically. Fine-tune manually if needed. In this image, a minor correction of −0.63° did the job. (See Exhibit B and C below)


Go down to the ‘Lens Corrections’ sub-panel in the right panel (See Below).
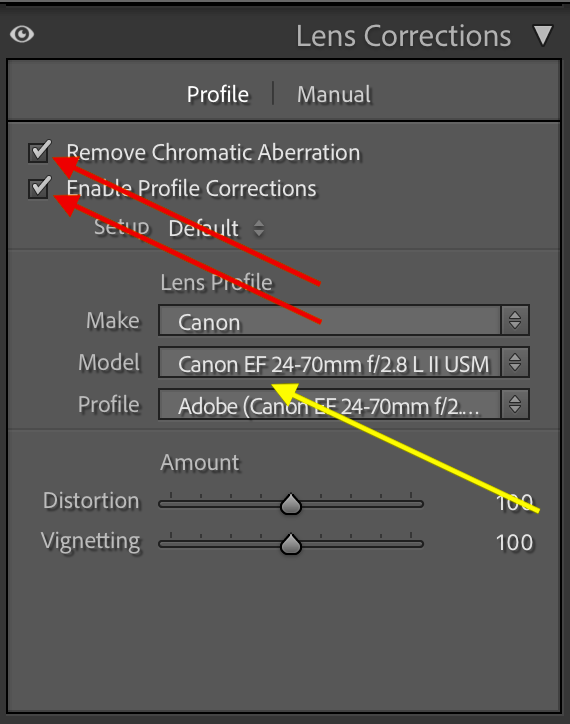
Click on ‘Enable Profile Corrections’ and ‘Remove Chromatic Aberration’ check boxes (See Exhibit D). You will see the lens distortion getting addressed in the image. It is starkly visible if the lens has tremendous distortion — and this also helps you understand how good or bad your lens is. If there is no visible change, click the ‘Profile’ tab in the Lens Corrections sub-panel and check if the profile correction has been applied. If it hasn’t, manually select the manufacturer and lens model from the dropdowns. Lightroom will auto-detect your camera and lens combination in most cases — in this instance, it correctly identified the Canon EF 24-70mm f/2.8L II USM without any manual input. If your lens profile is not there, search online for your specific lens profile and add it to Lightroom so you may use it every time in future.
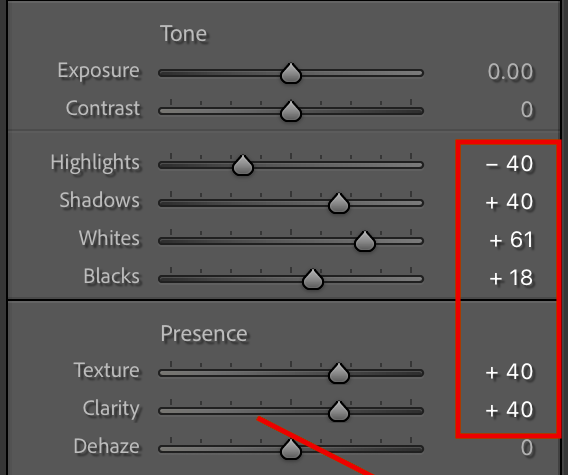
Go to the ‘Basic’ sub-panel in the right panel (it is the topmost sub-panel). And move to the ‘Tone’ section of the Basic sub-panel. If you have been processing images for a while, you may have saved a Preset with your preferred starting values — this saves you from repeating the same moves on every image from scratch. My starting preset sets Highlights to −40, Shadows to +40, Whites to +25, Blacks to +20. Apply it as your starting point.

Next, press the ‘Alt/Option’ key and start moving the ‘Whites’ slider to the RIGHT. Do that till the entirely black image starts to show some spots of colour — that is the clipping point. Back off slightly from there. Similarly, press the ‘Alt/Option’ key and start moving the ‘Blacks’ slider to the LEFT till the entirely white image starts to show some colour or blacks. Back off slightly from the clipping point. This step sets the white and black points precisely for each individual image, cutting haze and adding life to the image. In this image, Whites settled at +61 and Blacks at +18.
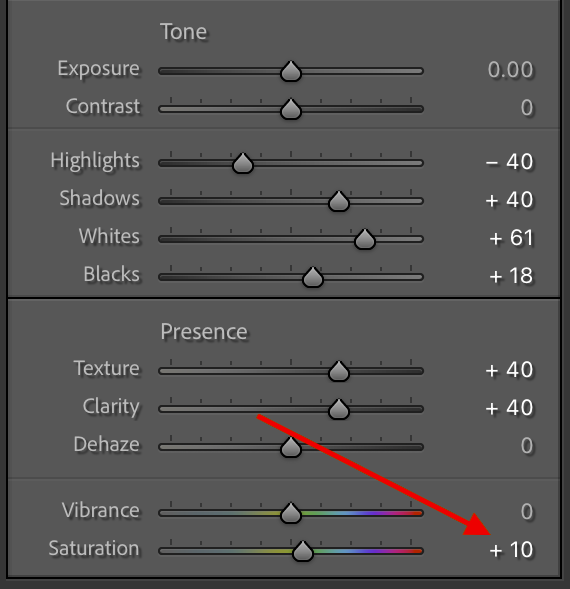
Now move to the ‘Presence’ section of this sub-panel. Current versions of Lightroom Classic have added a very useful slider here that did not exist earlier — Texture. Use it before Clarity. Move the Texture slider to the RIGHT (~+40). Texture enhances mid-frequency surface detail — the kind you see in boat surfaces, rippling water, sand, and clouds — without the halo risks that high Clarity values can produce. Then use the Clarity slider and move it to the RIGHT (~+40). This adds contrast to the mid-tones, not to the whole image.
DO NOT USE THE CONTRAST SLIDER AS IT WILL NULLIFY YOUR ATTEMPT TO CUT HIGHLIGHTS OR RECOVER SHADOWS. YOU ONLY WANT TO BRING OUT CONTRAST IN THE MIDTONES AND NOT THE WHOLE IMAGE.
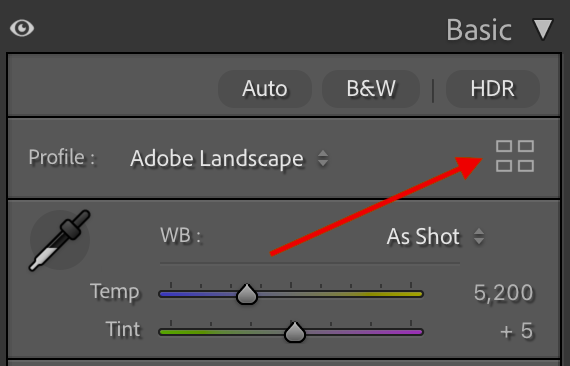
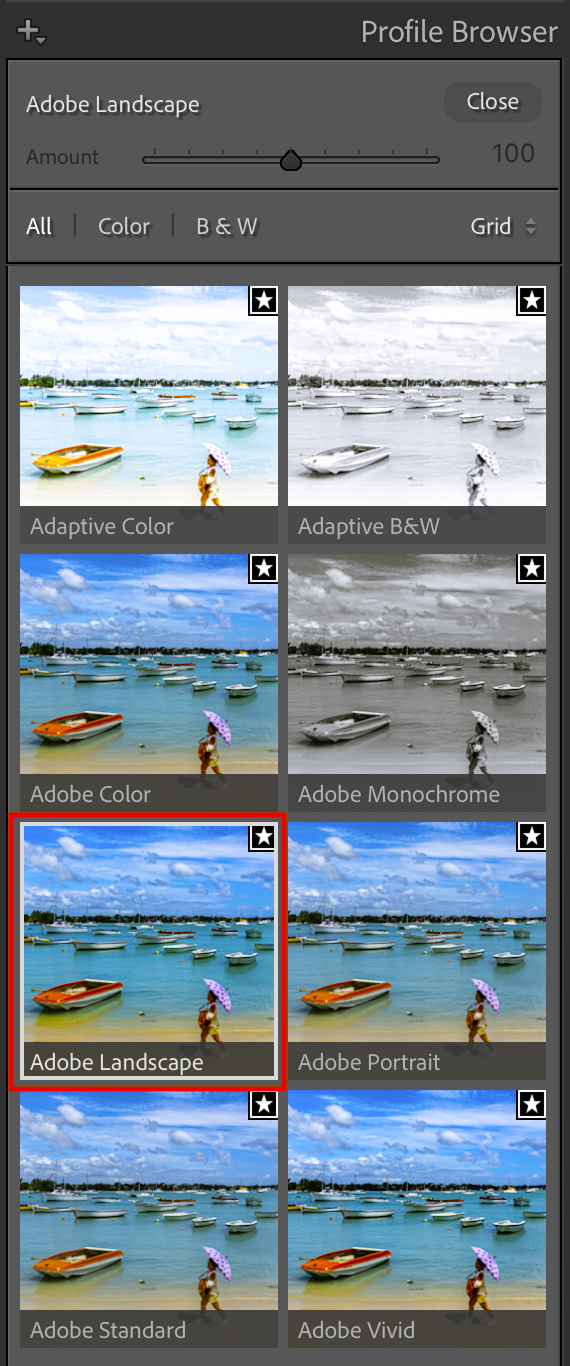
Now, look at the very top of this ‘BASIC’ panel at the ‘Profile’ field. By default it reads Adobe Standard. If you are processing a travel or landscape image, click the four-square grid icon to the right of the Profile field to open the Profile Browser and select ‘Adobe Landscape’. Think of the Profile as choosing the right film stock before you shoot — it determines the fundamental rendering of colour and tone beneath all your manual adjustments, and gets you much closer to what your eye saw at the location.
Switching to Adobe Landscape profile causes some of your Basic panel slider values to redistribute — this is entirely normal. The profile has its own underlying tone rendering and Lightroom adjusts accordingly. The final Basic panel values in this image settled as shown below. Notice that Vibrance was left at 0 and Saturation at just +10 — the Adobe Landscape profile had already done substantial colour work, so far less is needed from these sliders than you would require with Adobe Standard.
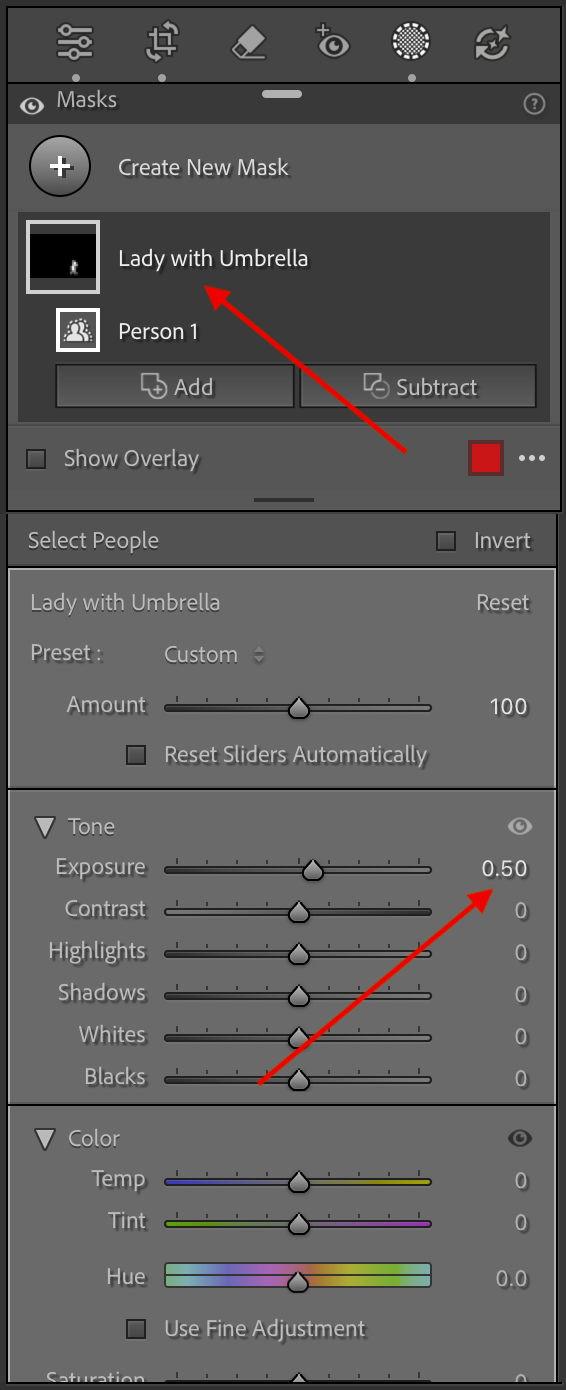
By now your image is already starting to look striking. But here is where current Lightroom Classic truly leaps ahead of older versions — AI Masking. Click on the Masking icon in the toolbar (the dotted circle, or press Shift+W) and you will see a full menu of AI-powered options.

In this image, the lady walking with the umbrella was in shade relative to the bright beach and water behind her. I used ‘Select People’, which automatically identified her as Person 1 and created a precise mask around her in one click. I then applied an Exposure boost of +0.50 to lift her out of the shade without affecting anything else in the frame.
In older versions of Lightroom, doing this would have required careful manual brushwork around the subject. The AI masking does it in one click and respects edges, transitions, and fine detail with impressive accuracy. This is the single biggest leap in the editing workflow since Lightroom 5.
With these steps, you would see that you have managed to transform your image. Try and bring the image as close to what you saw rather than over-processing and making it look unnatural.

You may now export the processed image. Ideally export it as .jpg (sRGB) since all major platforms — WordPress, Instagram, X — require or strongly prefer sRGB.
The edit/processing steps outlined above are essentially to get around the limitations of the camera and lenses we use — and these edits are a must for your images to leap off the page/screen.
In case of further queries, please leave a comment and I’ll be happy to clarify.
Happy Lightroom-ing!


Using Lightroom: A Simple Workflow – https://t.co/7v28blSX0P via @TravelureAjay #photography #tips
Yesssss thank you for sharing this! I use Lightroom too and I found your workflow very helpful.
Renne, thanks! Glad this is of use!
I have book marked this for myself ….very well written and very useful indeed.
If a post gets bookmarked, that talks a lot about its success and usefulness. I feel good, Ami!
Very informative post. I’ve never used Lightroom before, but often considered it. Thanks!
Thanks! Glad I could inspire you into trying out Lightroom, bsfralic!
Very useful and informative, not tried Lightroom yet, but will do and refer to your post for help. Thanks for sharing
You are welcome, Vyjay!
RT @TravelureAjay: Want some Quick & Dirty step-by-step on Lightroom Editing? Visit:
https://t.co/ISiy35efyX https://t.co/IWXkzSzu3e
Okay, I’ll try lightroom again. Like you said: overwhelming. I know that a tool like this can be amazing and you’ve just totally proved that. Will attempt it with our upcoming tour…
Glad to be able to inspire, Rob!
RT @TravelureAjay: Want some Quick & Dirty step-by-step on Lightroom Editing? Visit:
https://t.co/ISiy35efyX https://t.co/IWXkzSzu3e
RT @TravelureAjay: Want some Quick & Dirty step-by-step on Lightroom Editing? Visit:
https://t.co/ISiy35efyX https://t.co/IWXkzSzu3e
Great post! When I just started working with Lightroom – 5 months ago- it was a little overwhelming but now I’m using the exact workflow as you are. Means I’m doing something right 🙂
If a photographer attempts to make his/her image as he/she saw it, that is the right way to remain faithful to the subject shot! This process helps one do just that. So, from that point of view, I guess we both are doing something right, Cynthia! ?
So thorough! This guide would be great to print out and use along with Lightroom until I get the hang of it.
IMO, A guide is purposeful if it is thorough. That’s what I attempted while creating it. Glad you endorse it as thorough, and hence, useful, Ann! I guess I succeeded! ?
RT @TravelureAjay: Want some Quick & Dirty step-by-step on Lightroom Editing? Visit:
https://t.co/ISiy35efyX https://t.co/IWXkzSzu3e
RT @TravelureAjay: Want some Quick & Dirty step-by-step on Lightroom Editing? Visit:
https://t.co/ISiy35efyX https://t.co/IWXkzSzu3e
RT @TravelureAjay: Want some Quick & Dirty step-by-step on Lightroom Editing? Visit:
https://t.co/ISiy35efyX https://t.co/IWXkzSzu3e
RT @TravelureAjay: Want some Quick & Dirty step-by-step on Lightroom Editing? Visit:
https://t.co/ISiy35efyX https://t.co/IWXkzSzu3e
I just tried editing my first picture and this works like a dream! Wow.
Glad it worked for you, Shubham! IMO, this tool (Lightroom) is actually a photographer’s tool, while Photoshop is a digital artist’s tool mostly useful for digital manipulation and extremely cumbersome for dodging/burning kind of editing that a photographer needs to do!
Want some Quick & Dirty step-by-step on Lightroom Editing? Visit:
https://t.co/ISiy35efyX https://t.co/IWXkzSzu3e
Want some Quick & Dirty step-by-step on Lightroom Editing? Visit: https://t.co/ISiy35efyX
For some Quick&Dirty Lightroom, check out https://t.co/ISiy35efyX
If you edit your images in Lightroom, you will find this useful! Using Lightroom – A Simple Workflow https://t.co/ISiy35efyX
Using Lightroom – A Simple Workflow https://t.co/IcmA0i7Qxi via @TravelureAjay
Using Lightroom – A Simple Workflow https://t.co/Vc8OiH3POf via @TravelureAjay
Using Lightroom – A Simple Workflow https://t.co/ETdWFkuDmF via @TravelureAjay
Using Lightroom – A Simple Workflow https://t.co/nhG32nYkvk via @TravelureAjay
RT @Iannarino007: Using Lightroom – A Simple Workflow https://t.co/hXHE4FjDJA via @TravelureAjay
Using Lightroom – A Simple Workflow https://t.co/hXHE4FjDJA via @TravelureAjay
RT @Lilistravelplan: Using Lightroom – A Simple Workflow https://t.co/OeIYtX9olF via @TravelureAjay
RT @Lilistravelplan: Using Lightroom – A Simple Workflow https://t.co/OeIYtX9olF via @TravelureAjay
RT @Haidaloup: Using Lightroom – A Simple Workflow https://t.co/vZr1NzfBS8 via @TravelureAjay
Using Lightroom – A Simple Workflow https://t.co/vZr1NzfBS8 via @TravelureAjay
RT @Lilistravelplan: Using Lightroom – A Simple Workflow https://t.co/5d5agbpp3S via @TravelureAjay
RT @Lilistravelplan: Using Lightroom – A Simple Workflow https://t.co/5d5agbpp3S via @TravelureAjay
RT @Lilistravelplan: Using Lightroom – A Simple Workflow https://t.co/5d5agbpp3S via @TravelureAjay
RT @Lilistravelplan: Using Lightroom – A Simple Workflow https://t.co/5d5agbpp3S via @TravelureAjay
Using Lightroom – A Simple Workflow https://t.co/5d5agbpp3S via @TravelureAjay
Using Lightroom – A Simple Workflow https://t.co/UHm1ylPbYj via @TravelureAjay
Using Lightroom – A Simple Workflow https://t.co/62mU9PuCGP via @TravelureAjay
Very useful tips Sir. I processed some images and they look more beautiful now. Thank you very much.
Thanks, Solobackpacker!
Using Lightroom – A Simple Workflow https://t.co/URMYXEdy7v